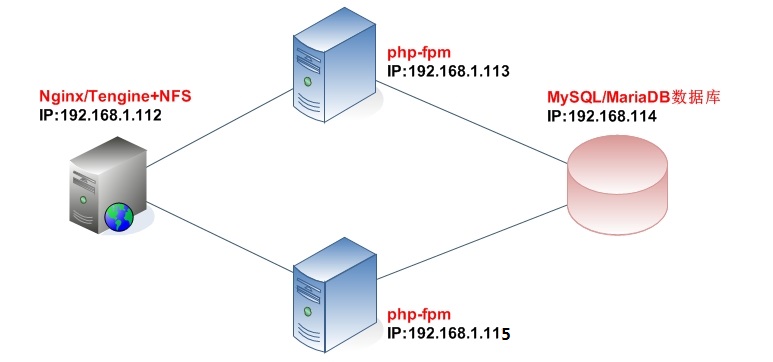
这个架构比较简单,不做过多的说明
前端1台Nginx:负载均衡+nfs
中间2台php:php-fpm
后端1台数据库:MySQL
安装略,参考《lnmp最新源码一键安装包》
192.168.112安装Tengine
192.168.1.113/192.168.1.115安装php
192.168.1.114安装MySQL
nfs配置
nfs服务端:192.168.1.112
检查nfs否已安装,这里我已经都安装了。
[root@linux2 ~]# rpm -qa | grep nfs
nfs-utils-1.0.9-66.el5
nfs-utils-lib-1.0.8-7.9.el5
[root@linux2 ~]# rpm -qa | grep portmap
portmap-4.0-65.2.2.1
如果你检查发现没有安装,可以使用一下命令进行安装;
yum -y install nfs-utils portmap
cat /etc/exports
/home/wwwroot   192.168.1.0/24(rw)
设置固定端口,方便配置iptables
cat >> /etc/sysconfig/nfs << EOF
RQUOTAD_PORT=50001
LOCKD_TCPPORT=50002
LOCKD_UDPPORT=50002
MOUNTD_PORT=50003
STATD_PORT=50004
EOF
iptables -I INPUT 5 -s 192.168.1.0/24 -p tcp -m state --state NEW -m tcp --dport 111 -j ACCEPT
iptables -I INPUT 6 -s 192.168.1.0/24 -p udp --dport 111 -j ACCEPT
iptables -I INPUT 7 -s 192.168.1.0/24 -p tcp -m state --state NEW -m tcp --dport 2049 -j ACCEPT
iptables -I INPUT 8 -s 192.168.1.0/24 -p udp --dport 2049 -j ACCEPT
iptables -I INPUT 9 -s 192.168.1.0/24 -p tcp -m state --state NEW -m tcp --dport 50001:50004 -j ACCEPT
iptables -I INPUT 10 -s 192.168.1.0/24 -p udp --dport 50001:50004 -j ACCEPT
service iptables save
开机自动启动nfs
chkconfig portmap on
chkconfig nfs on
service portmap start
service nfs start
现在看看启动的端口:
rpcinfo -p localhost
nfs客户端:192.168.1.113,192.168.1.115
yum -y install portmap
chkconfig portmap on
service portmap start
查看远程nfs共享信息
showmount -e 192.168.1.112
在/etc/fstab配置文件中添加如下,开机自动挂载
192.168.1.112:/home/wwwroot /home/wwwroot nfs defaults 0 0
重新读取/etc/fstab配置文件挂载所有
mount -a
数据库:192.168.1.114
如:举例网站程序是discuz,创建数据库、赋权,让php能远程访问,如下:
# mysql -uroot -p
mysql> create database linuxeye_bbs;
mysql> grant all privileges on linuxeye_bbs.* to linuxeye_user@'192.168.1.%' identified by 'linuxeye_password';
mysql> flush privileges;
iptables配置
iptables -I INPUT 5 -s 192.168.1.0/24 -p tcp -m state --state NEW -m tcp --dport 3306 -j ACCEPT
service iptables save
php:192.168.113
lnmp脚本用的是本机127.0.0.1,为了支持让前端Tengine访问,修改配置文件/usr/local/php/etc/php-fpm.conf
listen = 192.168.1.113:9000
listen.allowed_clients = 192.168.1.112
service php-fpm restart
iptables配置
iptables -I INPUT 5 -s 192.168.1.112 -p tcp -m state --state NEW -m tcp --dport 9000 -j ACCEPT
service iptables save
php:192.168.115
同理,修改/usr/local/php/etc/php-fpm.conf
listen = 192.168.1.115:9000
listen.allowed_clients = 192.168.1.112
service php-fpm restart
iptables配置
iptables -I INPUT 5 -s 192.168.1.112 -p tcp -m state --state NEW -m tcp --dport 9000 -j ACCEPT
service iptables save
Tengine:192.168.112
配置Tengine负载均衡,在主配置文件/usr/local/tengine/conf/nginx.conf中http段添加如下
        upstream cluster_discuz {
                ip_hash;
                server 192.168.1.112:9000;
                server 192.168.1.115:9000;
        }
添加虚拟主机文件
运行lnmp/vhost.sh,创建虚拟主机(我这里添加的直接是ip192.168.1.112)
修改虚拟主机配置文件/usr/local/tengine/conf/vhost/192.168.1.112.conf
location ~ .*\.(php|php5)?$  {
        fastcgi_pass cluster_discuz;
        fastcgi_index index.php;
        include fastcgi.conf;
        }
重启nginx
service nginx restart